Calmo Bridge IDE
Calmo Bridge IDE is an AI-native integrated development environment designed specifically for SREs that connects your local machine to the Calmo AI platform. It combines a powerful terminal, file browser, code editor, and AI chat interface in one seamless workspace—enabling you to collaborate with AI agents while maintaining complete control over your local environment.Overview
The Calmo Bridge IDE transforms how you interact with Kubernetes and cloud infrastructure by providing a complete AI-powered development environment with:- Integrated Terminal - Execute commands with real-time output streaming and shell integration
- File Browser & Editor - Navigate and edit workspace files with syntax highlighting
- Side-by-Side Chat - Converse with Calmo AI without leaving your development environment
- Human-in-the-Loop Approval - Review and approve commands before they execute
- MCP Server Integration - Extend Calmo’s capabilities with Model Context Protocol servers
- Visual Workspace Management - Organize projects with categorized workspace types
Key Features
Integrated Terminal
Real-time command execution with shell integration. See output as it happens, with full support for colors, progress bars, and interactive commands.
File Browser & Editor
Navigate your workspace files in a tree view. Open, edit, and save files with syntax highlighting—all within the Bridge.
Command Approval
Review every command before it runs. Deny risky operations or set up auto-approve patterns for trusted commands.
Side-by-Side Chat
Chat with Calmo while viewing terminal output and editing files. No context switching between windows.
MCP Servers
Connect external MCP servers for documentation lookup, sequential thinking, and specialized tools.
Activity Monitoring
Track all commands, view execution history, and monitor real-time bridge activity in dedicated panels.
System Requirements
Browser Compatibility:
- Chrome, Firefox, Edge (recommended)
- Safari and Brave have limited support
Installation
1
Download Calmo Bridge IDE
Download the latest version from app.getcalmo.com/integrations/bridge or click Connect Local Bridge in any chat.
2
Install the Application
macOS:
- Open the downloaded
.dmgfile - Drag Calmo Bridge IDE to your Applications folder
- Launch from Applications or Spotlight
- If prompted about an unidentified developer, go to System Preferences → Security & Privacy → Open Anyway
- Run the downloaded installer
- Follow the installation wizard
- Launch from Start Menu
- Extract the downloaded package
- Run the installer script or AppImage
- Launch from applications menu
3
Complete Welcome Wizard
On first launch, you’ll see a 4-step welcome wizard that guides you through:
- Connecting to Calmo
- Setting up workspaces
- Configuring MCP servers (optional)
Welcome Wizard
The first time you launch Calmo Bridge IDE, a welcome screen introduces the key features: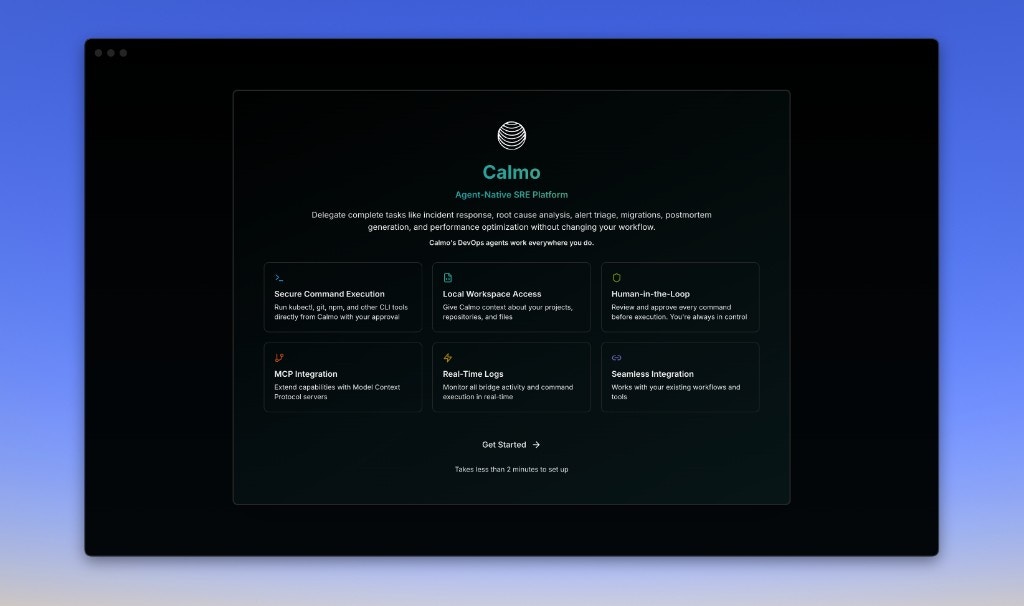
- Secure Command Execution - Run kubectl, git, npm, and other CLI tools directly from Calmo with your approval
- Local Workspace Access - Give Calmo context about your projects, repositories, and files
- Human-in-the-Loop - Review and approve every command before execution. You’re always in control
- MCP Integration - Extend capabilities with Model Context Protocol servers
- Real-Time Logs - Monitor bridge activity and command execution in real-time
- Seamless Integration - Works with your existing workflows and tools
- Connecting to Calmo (pairing)
- Setting up workspaces
- Configuring MCP servers (optional)
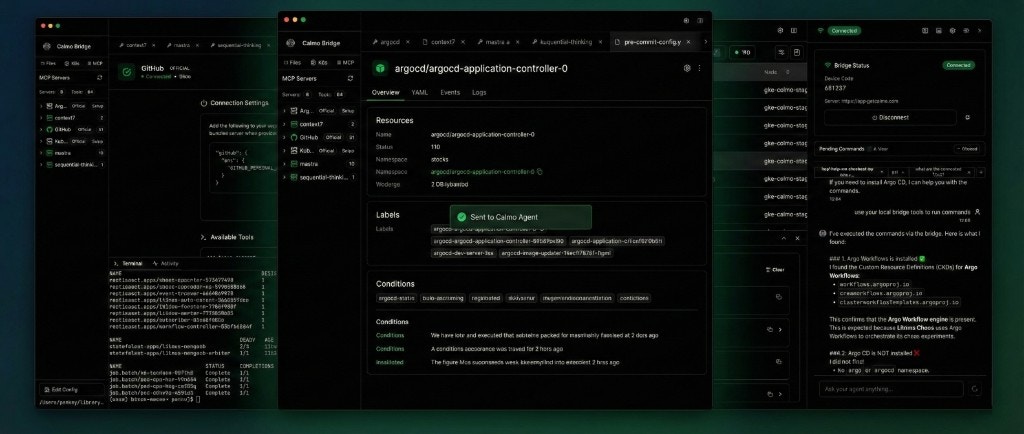
Main Interface
Once connected, Calmo Bridge IDE provides a three-panel workspace:Layout Overview
Left Sidebar: Navigation
Workspaces Section:- Expandable tree view of your local projects
- File and folder icons
- Quick navigation to any workspace file
- + button to add new workspaces
- List of connected MCP servers
- Server type badges (http/stdio)
- Tool count for each server
- Click to view server details
- Edit Config button to modify configuration
Center Panel: Editor & Terminal
File Editor (Top):- Tabbed interface for multiple open files
- Syntax highlighting for all major languages
- Line numbers and code folding
- Edit workspace files directly
- Terminal tab - Real-time command output with shell prompt
- Activity tab - Command history with execution status
- Resizable split view
- Command completion indicators
Right Sidebar: Chat & Status
Chat Interface:- Full conversation with Calmo AI
- Message history with timestamps
- Input field for new messages
- Context indicators showing what Calmo can see
- Pending commands awaiting approval
- Risk level badges (LOW RISK, MEDIUM, HIGH)
- Three action buttons: Deny, Always, Allow
- Command queue counter
- Connection status indicator (green = connected)
- Device code display
- Server URL
- Disconnect button
- Settings access
Pairing Your Device
After installation, pair your bridge with your Calmo account:1
Generate Pairing Code
In your Calmo chat, click the device selector and select Generate Pairing Code. A 6-digit code will appear.
2
Enter Code in Bridge IDE
In the Calmo Bridge IDE app, you’ll see a pairing modal with:
- 6 empty digit boxes for entering the pairing code
- “Open Pairing Page” link - Opens the Calmo integration page if you need to generate a code
- Bridge Status - Shows “Initializing…” then “Waiting for Code”
- Cancel button - Dismiss the pairing modal
3
Confirm Connection
Once paired, the Bridge Status panel displays: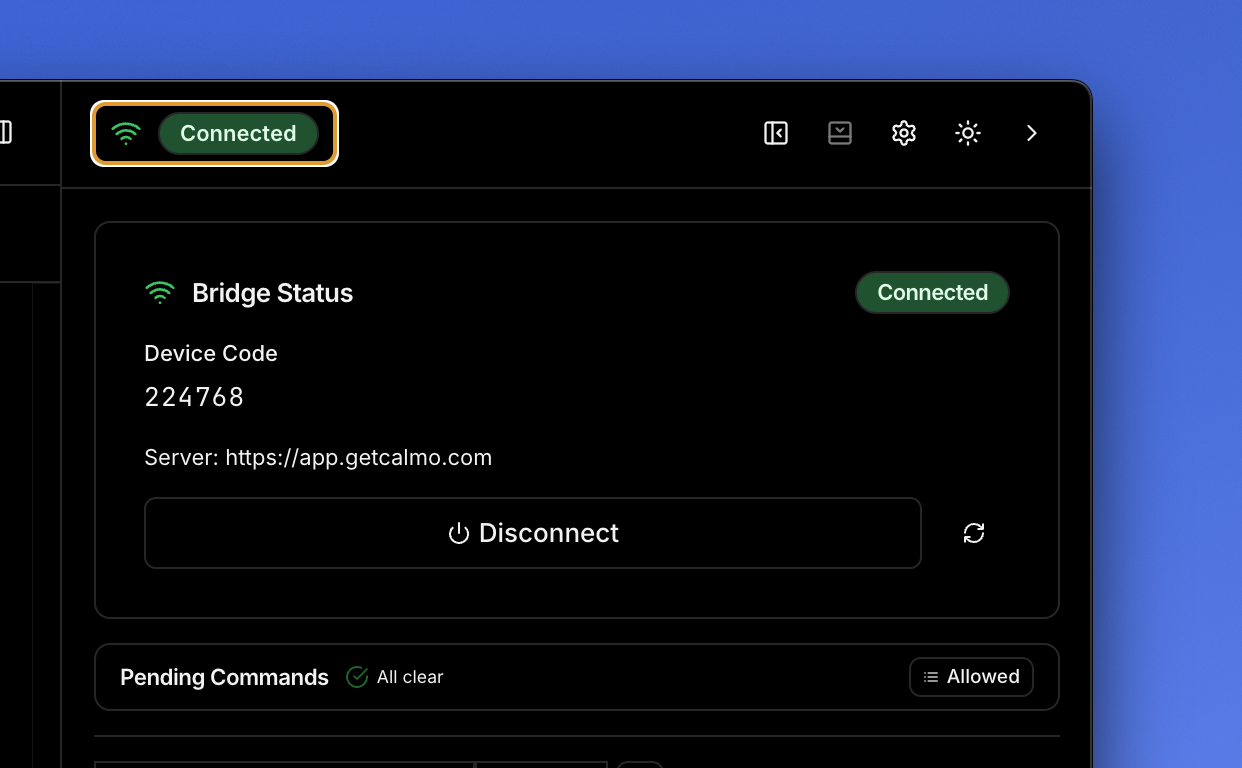
- 🟢 Green Connected status badge at the top
- Device Code - Your unique identifier (e.g., 224768)
- Server URL - https://app.getcalmo.com
- Disconnect button to unpair the device
- Pending Commands section showing “All clear” with “Allowed” badge
Pairing codes expire after 10 minutes. If it expires, generate a new code from the web interface.
Using the Integrated Workspace
The power of Calmo Bridge IDE comes from its integrated environment. Here’s a typical workflow:Workflow Example: Debugging a Kubernetes Issue
- Chat with Calmo (right panel): “Hey, check what pods are failing in the staging namespace”
-
Approve Command (Command Approval panel):
Click Allow to execute
-
View Output (Terminal panel):
- Continue Conversation (Chat): “Show me the logs for that api-server pod”
- Approve → See logs in terminal → Continue debugging
Working with Files
- Browse workspace files in the left sidebar
- Click a file to open it in the editor
- Ask Calmo about the file: “What does this configuration do?”
- Edit the file directly if needed
- Save changes with Cmd/Ctrl+S
Managing Workspaces
Workspaces give Calmo context about your local projects.Adding a Workspace
Click the + button in the Workspaces section: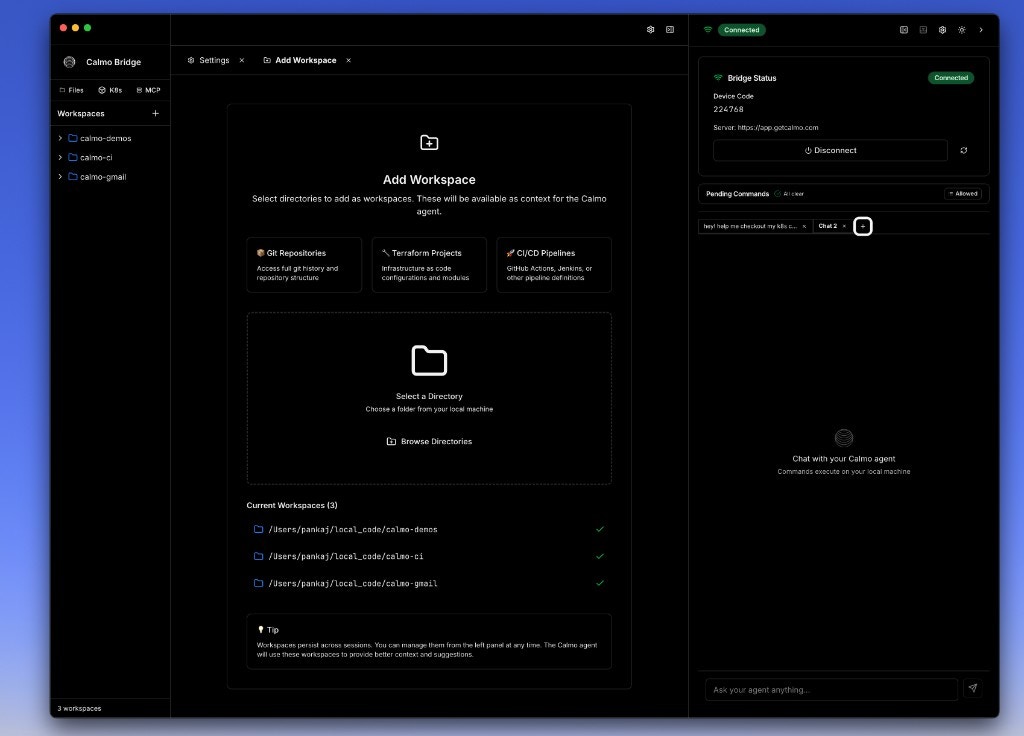
- 🎨 Git Repositories - Access full git history and repository structure
- 🏗️ Terraform Projects - Infrastructure as code configurations and modules
- 🚀 CI/CD Pipelines - GitHub Actions, Jenkins, or other pipeline definitions
Workspace Best Practices
- Add specific project directories, not your entire home folder
- Use categorization to help Calmo understand project types
- Remove workspaces you no longer need
- Each workspace appears as an expandable folder in the sidebar
Command Approval Workflow
Every command Calmo wants to run goes through your approval: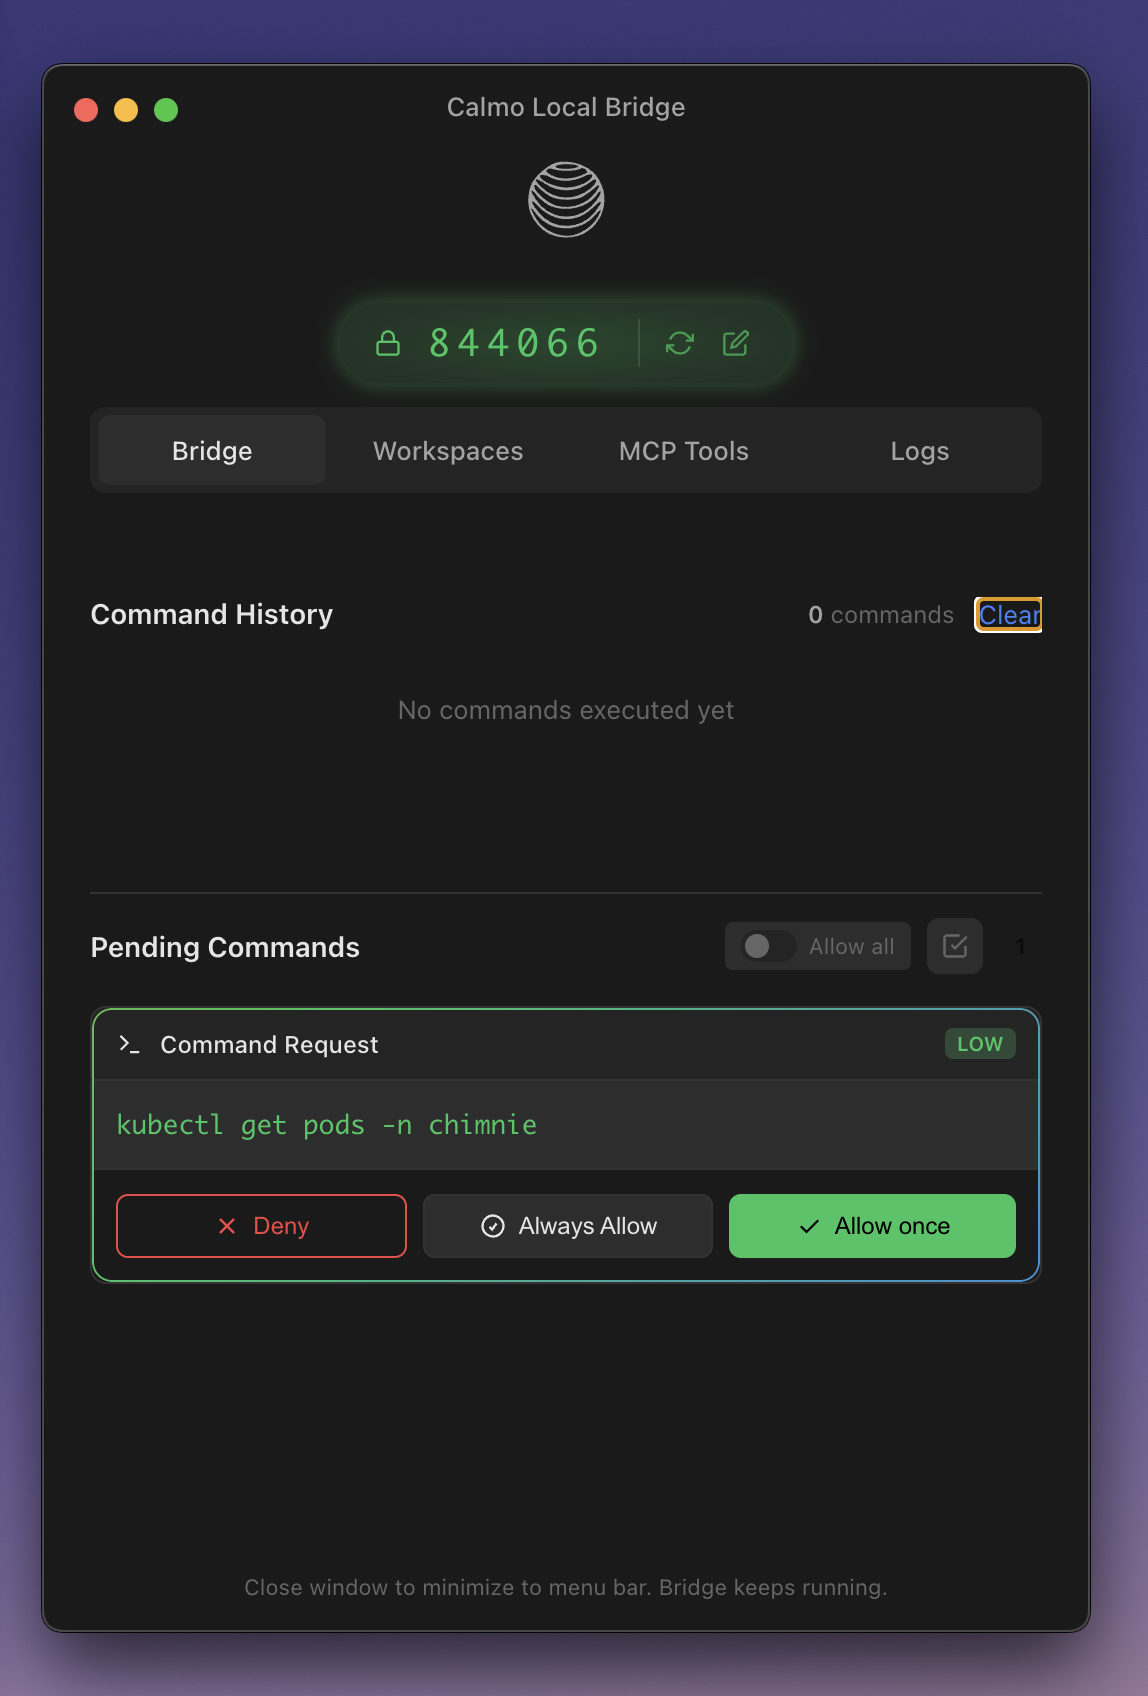
Approval Options
Risk Levels
Commands are automatically classified:- 🟢 LOW RISK - Safe read operations (
kubectl get,git status,ls) - 🟡 MEDIUM RISK - Write operations (
kubectl delete pod,git commit) - 🔴 HIGH RISK - Potentially dangerous (
kubectl delete deployment,rm -rf,terraform destroy)
MCP Server Management
Viewing MCP Servers
The MCP Servers panel (left sidebar) shows all configured servers: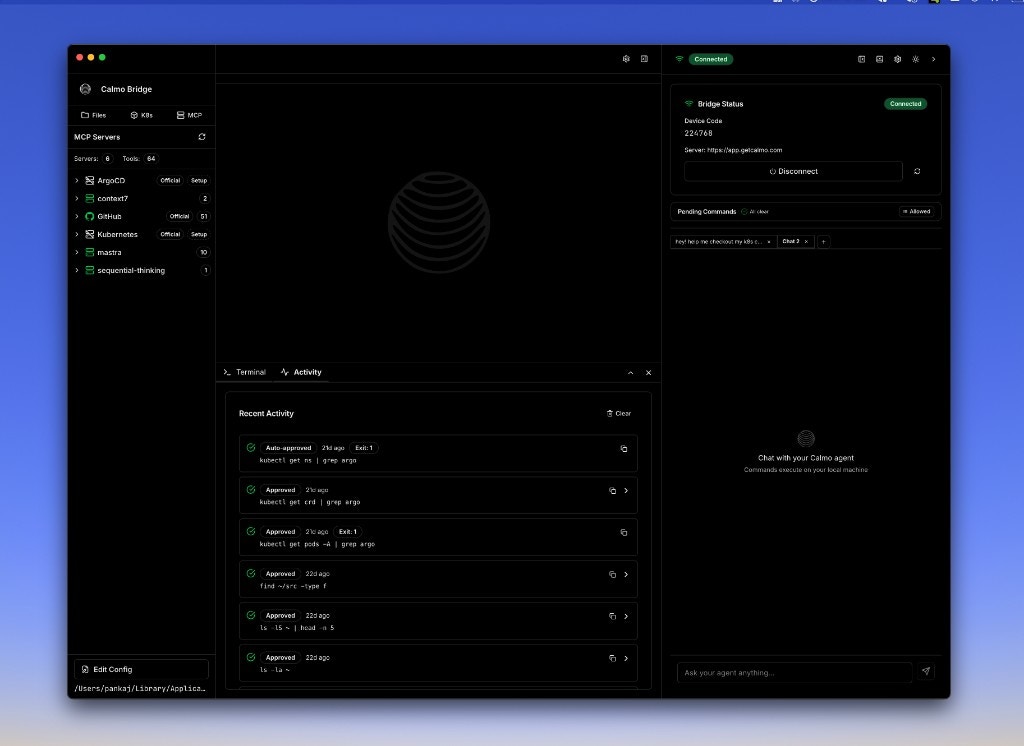
- Server name
- Type badge (http or stdio)
- Tool count (e.g., “2 tools available”)
- Connection status (expandable for details)
Server Details
Click on a server to view its details: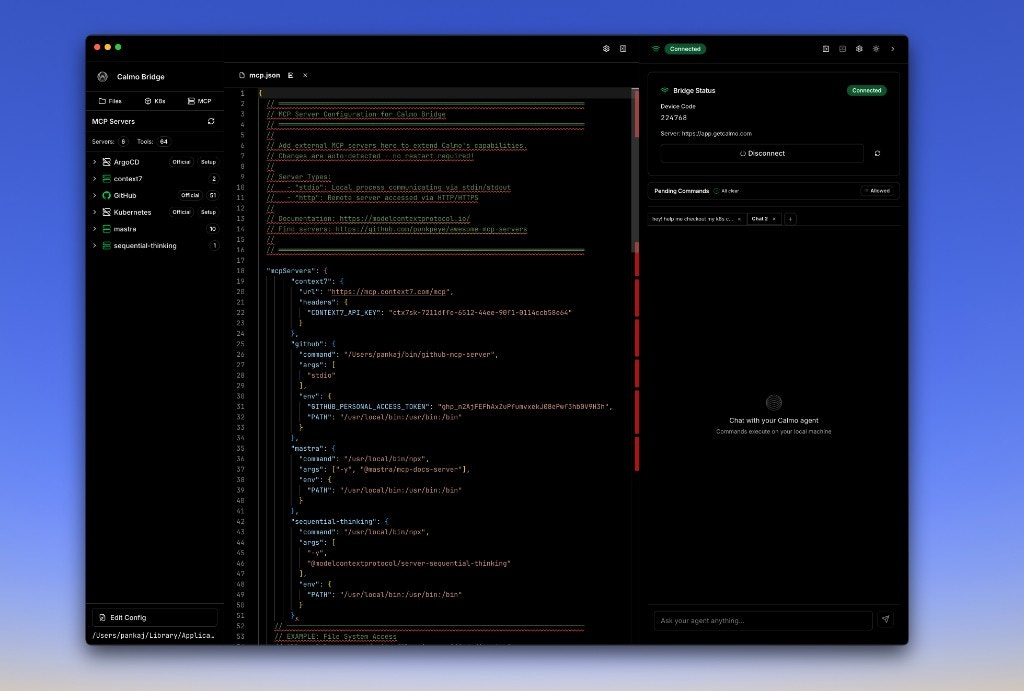
- Type - http or stdio transport
- Status - Connected/Disconnected
- Tools Available - Count and list of tools
- Reload Server button - Restart the server
- Edit Config button - Open mcp.json for editing
Activity Monitoring
Terminal Panel
Real-time command output with shell integration: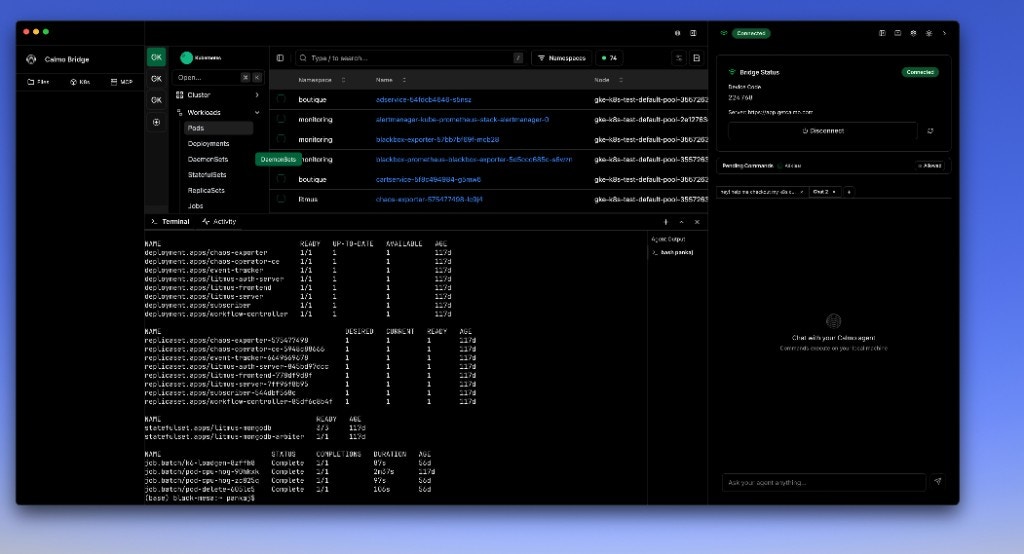
- Shell prompt showing current directory
- Real-time output streaming
- Color and formatting support
- Command completion indicators (✓ Command completed)
Activity Panel
View recent command history: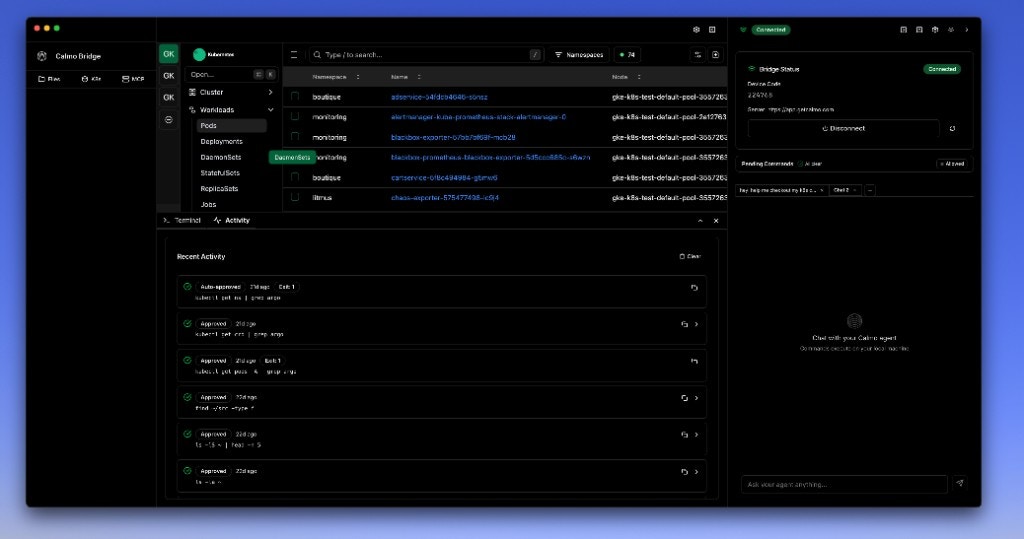
- ✅ Auto-approved - Matched an always-allow pattern
- ✅ Approved - Manually approved by you
- ❌ Denied - Rejected by you
- Timestamp and exit status (e.g., “1d ago Exit 1”)
- Full command (e.g., “kubectl get ns | grep argo”)
- Click to expand for full output
Security
Calmo Bridge IDE is designed with security as the top priority:- Human-in-the-Loop - You approve every command before execution (unless explicitly auto-approved)
- Local Execution Only - Commands run with your user permissions, not as root
- No Internet Exposure - Bridge IDE doesn’t expose your system to the internet
- Secure Pairing - Time-limited 6-digit codes ensure only authorized sessions connect
- Complete Audit Trail - Every command and action is logged in the Activity panel
- Sandboxed Workspaces - Calmo only has access to directories you explicitly add
- MCP Server Isolation - External servers run in separate processes with limited permissions
Menu Bar / System Tray
When you close the Bridge IDE window, it continues running in the background:- macOS: Bridge IDE icon appears in the menu bar (top right)
- Windows: Bridge IDE icon appears in the system tray (bottom right)
- Linux: Icon appears in the notification area
- Reopen the main window
- View connection status
- Access quick settings
- Quit the application completely
Keyboard Shortcuts
Next Steps
Workspace Management
Learn about the file browser, editor, and workspace organization
CLI Tools Reference
Explore command execution capabilities and the integrated terminal
MCP Configuration
Configure MCP servers to extend Calmo’s capabilities
Best Practices
Security recommendations and workflow optimization tips
Troubleshooting
Common issues and solutions for the integrated environment
Architecture
Technical details about how the Bridge IDE works under the hood
For assistance with Calmo Bridge IDE, contact our support team at support@getcalmo.com.